Photoshop Tutorial: How to Create an Avatar out of a Fantasy Video Game Character
The
Avatar movie (2009) revolutionized the meaning of the word avatar,
before it was any picture that could represent the online presence of
someone, now it's basically a Na'vi image.
This tutorial is not about how to transform someone into a na'vi but rather explains how to create an avatar based on a video game's character with no help of exterior sources.
This tutorial is not about how to transform someone into a na'vi but rather explains how to create an avatar based on a video game's character with no help of exterior sources.
End result:

Step 1
Alright, so first of all you need to pick a decent screen shot of a character. By decent i mean it should have some quality (even tho it's normally low) and the pose should be proper for an avatar, for example your character's back may not the best idea for an image.
I picked a RODE's (Rise of Dragonian Era) screen shot. If you don't want
to use external sources as i am going to do in this tutorial, you
should pick an attractive background or something that you can modify/enchant easily. I picked a burning ambient.

Step 2
Now a days avatars can have many sizes and dimensions. I decided to make a rectangular one
but once again it depends on the medium you wish to use it, some forums
only accept squared avatars, some sites only upload rectangular ones
and so on.
The dimensions required for an avatar are normally low, so the poor quality of your screen shot won't be a negative point.
Start by selecting and cutting the shot as you best wish using the Crop Tool (C).

Step 3
I started by modifying and adjusting a few things (i've marked them). Most likely to enchant the character:
1. Face - made her eyes and lips a little bigger; reduced the eyebrow's
size and thickness; made her hair lines straight (around the face);
increased the nose's size; adjusted the shine line on her chin.
2. Body - made the shoulder plate a little more rounded; adjusted the
chest plate (seems on the screen it got bugged); reduced the robe's size
on the neck.
Those are the areas that I've changed:
+ Increase.
- Decrease
* Modified/adjusted.

Step 4
To do what i said in the last step go to the main menu bar: Filter -> Liquidify.
Now depending on your task you'll use different tools. To modify you should use the first one Forward Warp Tool (W).
I've used brush density 50 and brush pressure 100 for everything, what
changes is the size of the brush, in smaller zones you need to decrease
it.
I made the shoulder first to exemplify the technique, most likely you push the metal back
(in the right/bottom direction) in an elliptical shape. I had to do
this procedure several times, doing it all at once may have a different
result. As you can see in the picture, the push is not really noticeable
but if you check step 6 image's, the round shape is there.

Step 5
For
the face you'll need to use two tools on the liquify: Forward Ward Tool
(W) and the Bloat tool (B) (for the eyes only). The first tool gives
you the best management of the parts you wish to alter so for example to
make the eyebrows more thick you just need to use the Foward Tool
around it.
The picture below seems confusing but it's basically the one i've marked before but now with the directions needed to achieve the effect i've described. Use the Forward Tool following the arrows and the Bloat Tool on the + marks.

Step 6
In the meanwhile you can start blurring out the edges,
the background's blurry already so it's fine if you blur it as well.
Use The Blur Tool with a strength of around 30% to do this.
So this is what you should have by now (original crop and the liquify/blur version):

Step 7
Make up step...
Eyes - Her eyes are already blue so let's enchant
it even more. With a bright cyan-blue brush, in a new layer, create two
dots in the center of her eyes. Normal brush with hardness at 0%
Opacity and Flow at 100%, the size should be around 15 pixels. Now
reduce the layer's opacity to 65% and it's blending to Overlay,

Step 8
Make
a new layer and using true white brush the white part of her eyes, you
can use the same brush details i described in the last step. Change the
layer's blending to soft light.
On the lips apply a soft light pink and brush it on the center leaving
the corners out (on a new layer too). Change this layer's opacity to 20%
and blending to Overlay.

Step 9
Using
a light pale cyan you'll brush her eye zone to create a bluish make up.
New layer > brush > blending to Color > opacity to 50%.
Duplicate it and change to overlay, the opacity changes to 40%.

Step 10
To increase the dynamic let's create a levels layer on: Layer > New Adjustment Layer > Levels.
Here are the settings and the image result:
(No way, we're not done yet)

Step 11
From
now on all you'll need is time and patience, nothing's hard but you
need to pay attention to details and that can be time consuming.
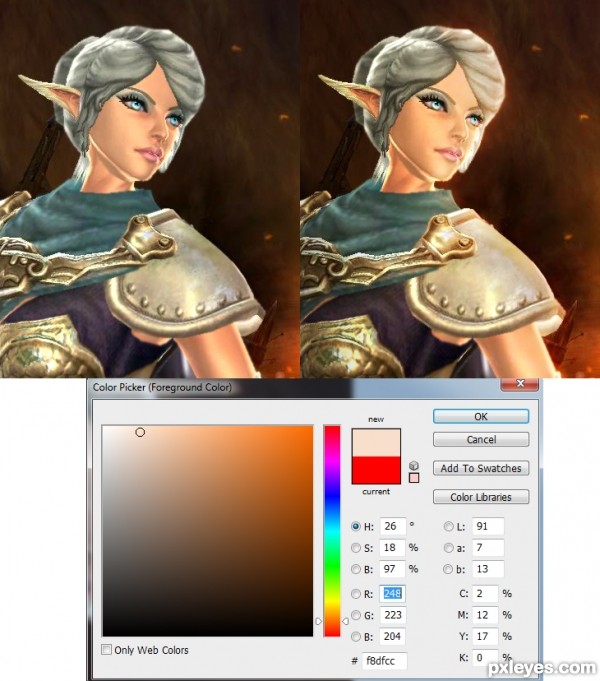
First of all, to match our flaming background, let's create an orange
ambient adding a Color Balance Adjustment Layer (Layer > Adjustment
Layer > Color Balance) with the settings below.

Step 12
In a new layer with a medium black brush (around 50 pixels) paint some dots around the right edge,
on the character's plate and on the background then apply blur
(Filter>Blur>Gaussian Blur), i did it with the amount of 20. Now
set this layer to Soft Light and change the opacity to 35%.
You should have something like this:

Step 13
Now
the highlight, i'll mark the zones i've highlighted so it's easier. In a
new layer and using a light orange i did the same method explained
above, creating dots and blurring them with Gaussian Blur. The brush
size in here varies a lot, around (15 for the face) and around 30 pixels
for the body.
I did this in three steps, three layers respectively.

Step 14
So
the first step: get a brush of around 30 pixels with the color below, a
very light orange (check the image below), and trace her face and body,
then blur it out and set the blending to Overlay at 75% Opacity.
Second: Same procedure, blending at Overlay and opacity at 50%.
Third: Same thing, follow the red lines, Overlay and opacity at 40%.
So this is what you should have now: before lights/shadows and now.
Step 15
I added some more levels again:

Step 16
Added some Curves and more Color Balance (on Adjustment Layer).
On the Curver layer tho i've erased the right bottom part because i
didn't want that part to get any lighter, just use the Eraser tool (E)
over it. This layer should be at 60% opacity and the Color Balance layer
should be at 20% opacity.
And that's what you get:

Step 17
As
you can see my character has large lines glowing around her but that's
fine! The background is glowing already, so this makes it more mystical.
It's exactly the effect we desire, if not i would have told you to
carefully underline her edges without coming to the background.
First i started by blurring most of the pieces carefully,
with a very small brush, specially on the skin and on the cloth, on the
platers i decided to smudge some to do not lose the shapes and forms,
just to make it less rough - use the Blur and Smudge Tools to do this.
Leaving the filters behind, let's get back to the shading part...
You'll need several layers, i used three. In the first paint in true black the left edge of her arm to cover the highlights
(figure 1 on the image below). You may want to blur it a lil either
with Gaussian Blur or with the Blur Tool itself. Then set it's opacity
to a realistic level, around 40%. Then duplicate it and set to Soft
Light... perhaps with a lil less opacity. It's not totally covered yet
but don't worry we'll add more layers on this area.
Now create a third layer and brush all the area set on step 2 on the
image below. Opacity to around 40% and normal blending. Now you should
have the arm's glowing totally covered by shadows, it creates a sensation of depth in that area, no light goes there since her arm and cape are covering the light source.
I've also decreased the armpit size with liquify, you can do it with the Smudge Tool easily as well, just push it up.

Step 18
I
added some basic highlight all over the image, i'll mark them all in
red again so it's easier for you. Note that the method is the same, a
very light orange brush on new layers, the opacity and brush size differ
from area to area and the blending is most likely to be on Overlay.
But this time you're going to apply really thin line on the edge of her body, around 3-5 pixels, zoom in a lot to create perfect lines.
I gave more enforce to the zones totally exposed to the light source,
face and arm on the right. And the parts that also should glow like the
plate edges, the ear and some parts of her hair. I'll leave the robe
for the next step since you need to highlight and shadow at the same
time, it's way easier.
On the picture below the lines i made are not perfect and are way too large, i made it this way so you can see the zones well.

Step 19
Before heading to the last hight lights and shadows i did a quick modifications on her chin, arm plate and neck.
In the chin i made it smaller, seemed a little out of proportion. Use liquify, Forward Warp Tool.
Same methods and tools for the plate, just make it a little more straight, there were some weird dune shape part on it.
Now the neck, i recreated it, i couldn't remove the
intense highlight on the left so i decided to make a new one. To do this
you'll need the Clone Stamp Tool (S) and the Smudge Tool. In a new
layer copy the neck part just close to the edge, the dark skin, but not the highlighted part. Once you have it, place it on the neck, you'll make it a little larger but it looks fine all the same, smudge the right edges to match the existent neck's skin.
On the bottom you'll need to use a sharp cut to match the robe, i've
used the Rectangle marquee tool to differentiate the zone i want to keep
and the one i don't.

Step 20
So now to the robe as i referred before. Use the light orange for highlights and true black for the shadows. I've marked the areas on the image below.
The highlights should at on Overlay at 100% and the shadows on normal blending at around 30%.
On the extreme left you may want to create another layer and re-do the
same idea with the same details but the opacity around 15%. I've done
this on the neck's edge as well, to create a more accurate shadow there,
where the skin meets the cloth.

Step 21
More highlights... as i said this is not hard just time consuming.
Back on her face, i've worked some on her nose, lips and eye zones.
Nose - Increased the shadow on the left side with a
black brush sized of 3 pixels, opacity of 15% and blending on Soft
Light. Also created a full continuity of light reflection on her nose
and mouth, there was a break before (using the light orange on Overlay,
100% opacity).
Lips - Highlighted the right side with light orange, around 3 pixels on Overlay. Increased the shadows in the middle and on the left with a true black on Overlay as well, opacity of 10%.
Face and eyes - Here it was just a minor light adjust, in her eyes i increased the glowing by 10%. With pixel 1 on black delimited her eyes a little more, specially on the parts that it was lacking more. Used minor highlight on the back of her eyes and on the nose zone. Finally used it again on the forehead (near the hair) too. Increased the shadow on her left cheek and on her neck with normal black at 20%.

Step 22
So this is what we have now: http://img850.imageshack.us/img850/3654/ava111.gif

Step 23
Added more highlights on her head/hair, on the very top and right side.
Light orange on a new layer, blurred out and on overlay at 25%. In the
very top i created another layer at 60% Overlay so it gets really shiny
there.

Step 24
Then I've added some shading on nearly all the plate
with a very thin black brush (2-3 pixels) at 50% on Soft Light. I added
a shadow to the lower ear part and inside of it as well.
Created a shadow coming from the left on all the armor, just brush a
medium black line use Gaussian Blur at 15 and change it to Soft Light at
60%.

Step 25
You're going to merge everything now and duplicate that layer, set it to Overlay at 20%. Now with the Eraser Tool you'll clear all the background areas.
To increase the fire color i created an orange Filter (Layer>Adjustment Layer>Photo Filter) the settings are below.

Step 26
We're almost done!
Let's add some text and strokes now.
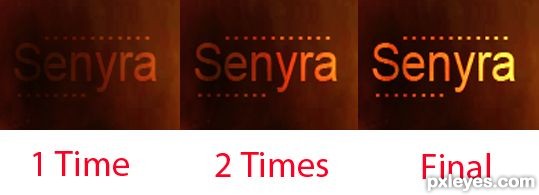
Text - Use the Horizontal Type Tool (T) and write a name you wish, I've
written the character's name "Senyra" with the Arial font at a size of
32. Placed it on the middle of the image on the extreme left. Then
changed it's blending to Overlay at 100%. Duplicated the layer three
times to intensify the effect.
Did exactly the same thing with dots (around the name), except i only duplicated them twice.
Stroke - Select all the image, create a new layer and right click on
Stroke. Select 15 pixels width and true white as color. Set the layer to
Overlay at 80%. Repeat this procedure but change the width of the
stroke to 7.
To finalize I've create a rectangular form with the Rectangular Marquee
Tool - Overlay, 50%. Placed it under the text and at the half of the
letter "n".
Also i've intensified the shadow on her face (left) and neck.
Step 27
Evolution: http://img705.imageshack.us/img705/82/giftfinalq.gif
I know it's not the quickest way to create an avatar but this way you
can transform any character you wish and you don't have to worry about
copyright issues.

Step 28
And there's the final result:
==================================
How to Create an Avatar out of a Fantasy Video Game Character
![How to Create an Avatar out of a Fantasy Video Game Character]() Reviewed by software
on
4:48 AM
Rating:
Reviewed by software
on
4:48 AM
Rating:
No comments: